

")

ARewO stands for "Animation Replicator with Offset" and is a nice little tool for motion graphics-style animations. It's like an array modifier supporting per-object animations and even armatures! Additionally, you can have great control over where the copies will be placed (e.g. along a path) and even offset their animation.
Extra, Extra: ARewO now comes with a randomize materials button.
You can download it here. (Right Click -> Save As). Save the arewo.py file on your disk, then start Blender and click on File -> User Preferences (CRTL + ALT + U). Click on the Addons tab and choose install from file. Select the arewo.py from your download location. Then go to the animation section of the Addons tab and check ARewO to enable it. Alternatively, you can type arewo in the search field and enable it from there.
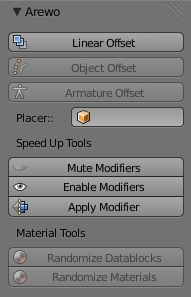
Once you have activated the ARewO Add-on, its buttons will appear in the Toolshelf (T-Menu). The first 3 buttons will produce replicas of your object, let's have a look at them first. Once you have an active object, you will be able to use ARewO, for Linear and Object Offset, this object is the Master Object, which will be replicated. For Advanced Offset, the Armature in your selection will be the Master Object, with however many children. If there is only one object selected, the Advanced will act just like the Object Offset, except it will carry modifiers.
Here are a few things you should (but not must) do before using ARewO to avoid unexpected results:
- Your master object should not have a parent - This can lead to strange behavior when selecting the "Create Parent" option.
- Apply rotation and scale for your master object - unless there is a specific reason not to.
- If you run into strange behavior there should be an explanation in the System Console, if not, this is an Alpha version, feel free to let me know, but please be specific.
- If you are planning to use the Armature Offset for multiple objects, they all need to be parented to the same armature. They don't have to be direct children, but then their parent has to be a child of the armature.
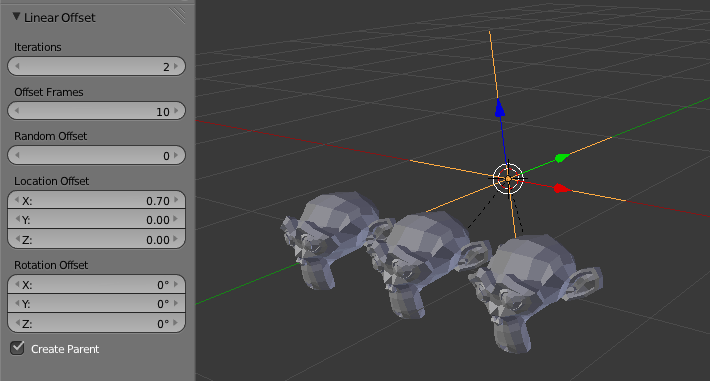
Fig. 1) The "Create Parent" Option will place an Empty in the middle of your scene which will be the parent of all replicates.
Linear offset:
If you select an object and press this button, you will get a bunch of options, here is the explanation:
- Iterations: Specifies the number of copies you will get (original plus 4 copies equals 5 Monkeys).
- Offset Frames: How many frames the animation of the next copy will be offset (delayed) in frames.
- Random Offset: Adds or subtracts a random number of frames until the next offset. E.g. a random value of 10 will result in the next animation starting up to +/- 5 frames offset from the above specified number of frames.
- Location / Rotation are fairly self-explanatory, however have a look at this part to learn more about how they work internally.
- Create Parent: This will create a parent object at the origin for all your generated copies. You can then easily change their world position / scale / rotation.
Object Offset / Armature Offset
The Object Offset is a lot more versatile in its offset options, even though it appears to have fewer settings.
You will have to specify a placer object in the panel in order for this to work. The placer will need to be animated, as it is used to distribute your copies. Let's take the most simple example: You're at frame 1, your placer is at (0,0,0) and it has another keyframe at frame 11, where its X-Location will be 10, if the interpolation is set to linear, in each frame your placer will be 1 BU right of its last position. If you choose another object now and run Object Offset, your copies will be spaced 1 BU apart starting at (0,0,0) and so on. But the fun does not stop there. You can go nuts animating the placer. You can use a Path, an animation or even some physics simulations to distribute your objects in space. Just scrub through the timeline and check where your object is in each frame to get an idea of what your result will look like.
Once you animated your placer, click Object Offset, and you will see the following options:
- Iterations: Specifies the number of copies you will get (original plus 4 copies equals 5 Monkeys).
- Offset Frames: How many frames the animation of the next copy will be offset (delayed) in frames.
- Random Offset: Adds or subtracts a random number of frames until the next offset. E.g. a random value of 10 will result in the next animation starting up to +/- 5 frames offset from the above specified number of frames.
- Start frame: This refers to the animation of the placer object. Let's say you're happy with the animation since frame 5, you will set your start frame to 5 and your chain of objects will start wherever your placer is at frame 5.
- Spacing: Maybe your placer's animation turned out too slow. You can choose to skip frames in that animation spacing your copies further apart.
- Inherit Scale: You can animate your placer's scale and gain very fine control on how large which copy is going to be.
- Inherit Rotation: You can also animate your placer's rotation, including its direction change along a path, to gain control over how your copies will be arranged.
- Create Parent: This will create a parent object at the origin for all your generated copies. You can then easily change their world position / scale / rotation.
- Hide Render: The original object will usually not be needed in the final render, since the copies are exactly where the placer was. Therefore, hiding it is on by default. Note: the copies will have show render enabled, independent of your original object, just in case you forgot that it was hidden from a previous test.
Note: Object Offset does not support modifiers, if your master object has any, they will be ignored on the copies, if you want to carry modifiers, use the Armature Offset (or the Apply Modifier in the Speed Up Tools. See below):
Armature Offset:
The advanced offset does basically the same thing as the Object Offset, but is more flexible. This is why it comes with the same options.
It is also slower which is why it's a separate button, here are the differences:
- It supports modifiers.
- It supports multiple objects, but in order for that to work, your objects need to be in a parenting hierarchy, where the master parent is an armature. That probably sounds more complicated than it is, here is an example: Object + Armature, Armature must be the parent of the object. 2 Objects and an armature: both objects must be parented to the armature. If you want to include a lattice or other helpers, make sure the lattice is parented to the armature as well, as everything moves relative to it.
- There is an additional button that allows you to disable all modifiers except Armature temporarily while testing. You can either uncheck this option when you're done testing, or use the "Enable Modifiers" button from the Speed Up Tools later (see below), which is faster.
Here are some important notes on how ARewO works internally:
After running ARewO, you will still be able to scrub through the timeline to check your animation offset, without losing the ability to alter your options.
The Location / Rotation Offset in Linear mode will alter the delta transformations of the copies. This has the great advantage that they will be independent of any existing keyframes for those properties. It is something to keep in mind, though, in case you do want to alter or keyframe them.
The same goes for the Inherit Rotation / Inherit Scale option.
Unfortunately, you cannot use location keyframes with the object / armature offset, due to the nature of the location method. Your objects will be placed in space, and jump back to their location determined by your keyframe once you change frames. There are 2 workarounds for this.
- If you are using Armature Offset, you can use the parent bone for your entire armature and animate it in pose mode.
- You can also turn around the principle of the linear offset and actually animate the delta location of your object, thus offsetting its absolute location.
The Add-on will create linked copies of all your objects. This has several advantages: If you want to make changes to your original, you can do it in edit mode, and it will be transferred to all the copies. They all share the same material, so it's easy to carry out changes after running in the mode of your choice. If you need to edit them separately, you can select them all, and press U -> "Object & Data". Because shapekeys are linked to the datablock of an object, not its animation, ARewO cannot work with Shapekeys. If you change the shapekey animation of an object, the changes will be transferred to all objects sharing its datablock.
If you select 0 time offset frames for your animation, but 50 frames for random offset, some of your copies will animate before frame 1. You can select them all, go to the Graph editor, select all channels using A and then press G -> X to move them in time, until there is no more keyframe before frame 1.
Some Examples:
You don't have to use the Add-on for animations only. It is also a quick way to position objects along a path, here is how:
- Create a path (e.g. Add -> Curve -> Beziér)
- Create the object you will use as a placer (e.g. Add -> Empty)
- Select your placer, then SHIFT-select the path, press CRTL + P and select "Follow Path"
- Your placer will now follow the path starting at frame 1, finishing at frame 101
- Select the object you want to be replicated.
- Press Object Offset
- Control the distance of your objects with the "Spacing" settings
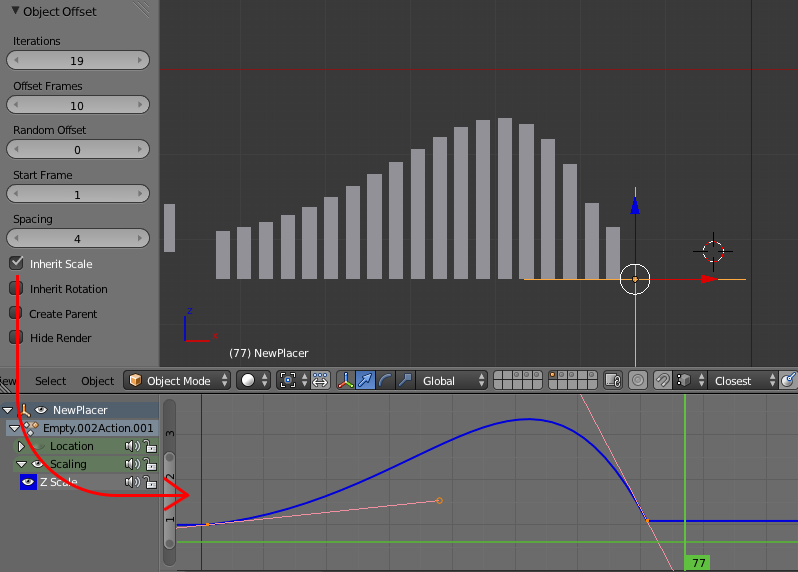
Fig 2.) The outline of the replicates resembles the curve of the Z-Scale of the NewPlacer object.
You can use the "Inherit" options to randomize the scale (or rotation):
- Select your placer object. (The one you put into the slot placer object in the ARewO Panel)
- Press I and choose: "Scale" keyframe
- Go to the Graph Editor
- Select the Z Scale Channel
- Press N, on the newly opened panel, scroll down to "Add Modifier"
- Choose "Noise" and select your settings. (Scale is basically the inverse frequency, Strength is the amplitude)
- If you want an even scale, you can use the little clipboard icon to copy the Modifier, then select the X and Y scale, and use the clipboard with the down arrow to paste it onto this F-Curve.
- If you run ARewO now and choose "Inherit Scale", your copies will have random scales.
Alternatively, you can actually gain great control of the overall look of your objects by animating the placer's scale manually. See how the shape of the "Trail" matches the Z-scale curve of the placer object in Fig. 2.
Last but not least: The Speed Up Tools:
Those four buttons are helpers, that you can feel free to also use without ARewO. Mute Modifiers will mute all modifiers on all selected objects, with the exception of the armature modifier. This can greatly increase the speed of the Armature Offset, but you will still be able to see your animation, because the armature modifier is still visible. If you want to see all your modifiers again, click Enable Modifiers. This goes for viewport visibility only, it does not effect the render settings.
The Apply Modifier button works a little differently than the one in the Modifier Stack. It will apply the first modifier of the active object and pass the changes on to all objects sharing the same datablock. This is especially handy since just linking the modifiers will destroy the instances in render. Cycles can't know you want them to be instances if they differ in their geometry which will be the case if they have a modifier attached.
If you use this operator, you will have two options:
- remove modifiers: Will remove all modifiers from objects with the same datablock. Meaning, if you already gave all your linked copies this modifier and used this button, they would act double on all objects but the active one. Also you'd lose the instance feature in render, so it makes sense to remove those modifiers.
- remove same type: If you are using different modifiers e.g. Armatures and want to keep them, use this option as it will only remove modifiiers that are the same type as the applied one.
Not a speed up tool, but still handy:
Randomize Datablocks: With this button you can assign a bunch of objects random materials. You need at least 2 objects selected in order for this to work. Assign all materials you want to be distributed over your objects to the active one. Then press Randomize Datablocks, and all selected objects will randomly get one of these materials assigned.
NOTE: This button is to be used with objects sharing the same, or at least very similar datablocks as the active one, since it creates instances. If - for example - you have a cube active and additionally a sphere selected, the sphere will become a cube with a random material.
Randomize Materials: This button is actually not supposed to be used with ARewO Replicates, because it destroys instances. Only use this if you want to assign random materials to different objects. This will destroy any instances and increases render times.
NOTE: Both randomizing buttons will remove all but one material from your objects, thus objects requiring more than one material to work are not suited for this method. Also it might be a good idea not to include the original object, if you want to redistribute the materials later on - saves you the hustle of assigning all those materials to one object again.
Have fun testing.
TODO:
- Include Random Scale button so you don't have to put noise on your placer