
Subsurface scattering (SSS) is an essential tool to make organic materials look real. They are probably most commonly used in human skin, but they pretty much apply for any living object, as well as some inanimate ones. Our skin consists of several layers, which all have different colors. Contrary to plastic they are also very heterogenous, meaning they consist of cells, blood, collagen and more. As a result light that penetrates the surface gets scattered.
And because light rays of different colors have different wave lengths, they get scattered by different factors. The vector input on SSS Shaders refers to how far a ray of light can potentially get scattered until it comes out from beneath the surface again and reaches the camera. X stands for red, Y for green and Z for blue light. Of course, that's the realistic approach to SSS, but for me as a beginner that posed a problem. It was really hard to predict how changes in the vector would actually influence the look, so there was a lot of guesswork involved. I kept thinking: Why can't I just choose a color that will shine through in thinner areas? With the new Principled Shader in Blender 2.79+ you actually have that option, along with a mix factor called subsurface. As in many situations that will save you a lot of mix shader nodes and lets you predict the translucent color pretty quickly. Unfortunately, that works for very quick and dirty approaches only, since the SSS color will heavily tint your object even in thicker parts. I personally would like to see an approach similar to V-Ray, where you can determine four colors, diffuse, shallow, medium and deep scattering. I think this is realistic enough and provides very intuitive control over your material.
Back to the vector issue. Let's assume you figured out the correct ratio between RGB (XYZ), but you want to use the same material on a larger model. For example, if you need to scale your entire scene. If you were using diffuse and glossy shaders only, scaling up your entire scene won't have much of an impact on the final image. Quite the contrary apllies for SSS materials.
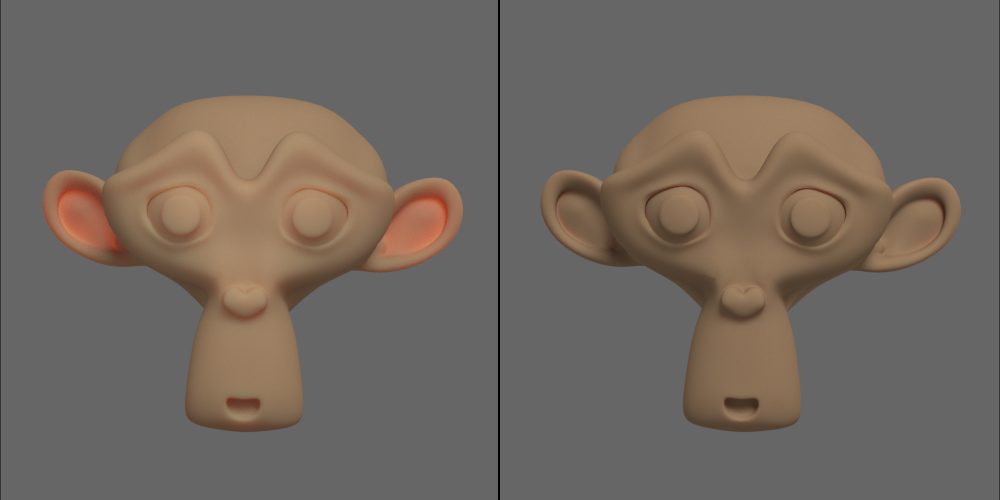
Fig. 1) Left: Suzanne with her original scale and a mesh light behind her. Right: The same scene, but scaled up 4x.
Since the values for X, Y and Z are in Blender Units, the size of your model will have a huge impact on how it looks in render. On the original SSS Shader node there was a scale factor. If you were happy with the look of your model, but for some reason needed to scale it, you could compensate that, because the original node came with a scale factor. The Principled Shader does not, so if you wanted to experiment with new values, you'd have to manually divide X, Y and Z by the scale and alter all three values. This is not a very practical approach, so here is a very quick workaround for this issue.
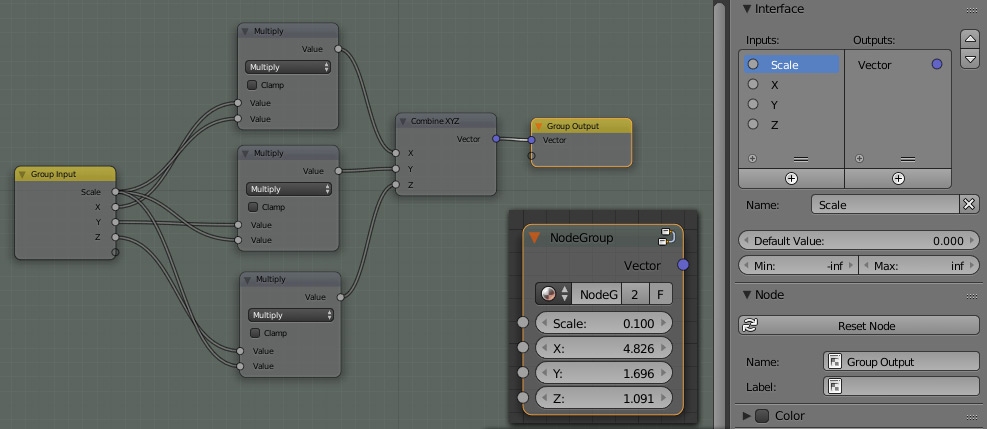
In this node group you can enter X, Y and Z separately and then multiply them all at once by the scale factor.
To recreate this node yourself do the following:
- Add a Converter -> Combine XYZ node.
- Press CTRL + G. This will create a node group and open it for you.
- If you can't see the Interface panel on the right, press N.
- Under Inputs click the + icon in the circle.
- Label the newly created input 'Scale', by double-clicking its name.
- Add a Converter -> Math node and set it to Multiply.
- Drag it on top of the connection between x in and x on the Combine XYZ node, the thread will turn orange and on release the node will be inserted at the right position.
- SHIFT + D to duplicate the Math node and repeat this for y and z.
- Connect the Scale input with the empty slot in each Math node.
- You're all set. Press TAB to exit group editing, connect the output of your group with the Subsurface Radius of your Principled Shader and control the scale once again with a single slider.
As a hint: you can even paint a black and white map for the scale if you want to tinker with the translucency of different areas. Same goes for the Subsurface factor of the Principled Shader, of course.
Doing the research for our book we looked for actually measured SSS values from a lab. They are really hard to find. Luckily, there is a list of SSS examples stored right inside Blender.
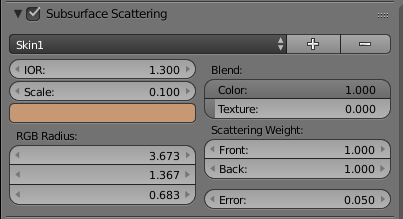
If you switch to Blender Internal renderer, go to the material tab. You have to have an object selected that has a material that is not using nodes. There you can scroll down to Subsurface Scattering and actually choose between ten presets. Picking one will fill in the values and you can copy them to your Cycles settings. Fiddling with the base color, this usually covers most of the SSS materials you will need.
For a more in-depth description of Subsurface Shaders check out our book on everything Cycles.